How to stop automatic updates on Windows 10

If you disable Windows 10 Updates, your system will be at risk from attack:
Windows Defender will not be updated
Windows Defender will not be updated
Operating System patches will not be applied
You will not be able to use the Windows Store
Windows Apps will not update and possibly fail.
You will not be able to use the Windows Store
Windows Apps will not update and possibly fail.
On the plus side your hardware will continue to work! I honestly have never updated my system after the initial update due to too many regular updates being dropped in and there are even cases where updates actually cause a system crash. Why bother breaking something that seems to work perfectly fine!!! So, unless you are dealing with extremely sensitive data, for a regular user turning off updates and having an antivirus installed on your system is more than enough to keep you safe. Just don't go looking for trouble at unwanted websites.
In this Windows 10 guide, we will walk you through the steps to prevent Windows Update from downloading and installing updates on your computer automatically.
How to PAUSE automatic updates with Settings
As mentioned in the title, this will temporarily pause auto updates upto a predefined date, so if you want to disable updates then move to the next methods that uses Group Policy / RegistryTo disable automatic updates temporarily, use these steps:
1. Open Settings.
2. Click on Update & Security.
3. Click on Windows Update.
4. Click the Advanced options button.
2. Click on Update & Security.
3. Click on Windows Update.
4. Click the Advanced options button.

5. Under
the "Pause updates" section, use the drop-down menu and select how
long to disable updates
Once you complete the steps, updates will no longer download until the day you specified. When the computer reaches the pause limit, you will need to install the latest patch available to make the option available again.
You can always undo the changes with the exact instructions
outlined above, but on step No. 5, choose the Select date option.
Alternatively, you can accomplish the same effect by clicking the Resume
updates button on the Windows Update page.
How to disable automatic updates with Group Policy
The Local Group Policy Editor available on Windows 10 Pro includes policies to permanently disable automatic updates or change the Windows Update settings to decide when patches should be installed on the computer.
2. Search for gpedit.msc on bottom searchbar and click the top result to launch the Local Group Policy Editor.
3. Navigate to the following path:
Computer Configuration > Administrative Templates > Windows Components > Windows Update
4. Double-click the Configure Automatic Updates policy on the right side.

5. Check the Disabled option to turn off automatic updates permanently on Windows 10

6. Click the Apply button
7. Click the OK button
After you complete the steps, the system will stop downloading updates automatically. However, the ability to check for updates manually will continue to be available on Settings > Update & Security > Windows Update, and clicking the Check for updates button to download the most recent patches.
4. Double-click the Configure Automatic Updates policy on the right side.

5. Check the Disabled option to turn off automatic updates permanently on Windows 10

6. Click the Apply button
7. Click the OK button
If you want to enable automatic updates on the device again, you can use the exact instructions outlined above, but on step No. 5, make sure to select the Not Configured option.
OPTIONAL additional settings for more control
In the above settings if you change DISABLED to ENABLED, then under the “Options” select the option to prevent updates from downloading and installing automatically on Windows 10:
- Notify for download and auto install.
- Auto download and notify for install.
- Auto download and schedule the install.
- Allow local admin to choose setting.
- Auto Download, Notify to install, Notify to Restart.
- Notify for download and auto install.
- Auto download and notify for install.
- Auto download and schedule the install.
- Allow local admin to choose setting.
- Auto Download, Notify to install, Notify to Restart.
How to disable automatic updates with Registry
To disable Windows 10 updates permanently modifying the Registry, use these steps:
1. In the Searchbar look for “regedit” and click the top result to launch the Registry Editor.
2. Navigate to the following path:
HKEY_LOCAL_MACHINE\SOFTWARE\Policies\Microsoft\Windows
3. Right-click the Windows (folder) key, select the New submenu, and then choose the Key option.

4. Name the new key WindowsUpdate and press Enter
5. Right-click the newly created key, select the New submenu, and choose the Key option

6. Name the new key AU and press Enter
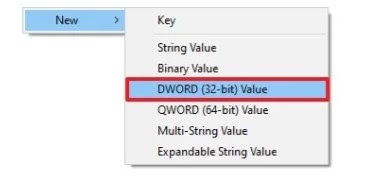
7. Right-click the AU key, select the New submenu, and choose the DWORD (32-bit) Value option
8. Name the new key NoAutoUpdate and press Enter.
9. Double-click the newly created key and change its value from 0 to 1.

10. Click the OK button
11. Restart your computer
After you complete the steps, Windows Update automatic updates will be disabled permanently. However, you will still be able to download updates as needed by clicking the Check for updates button on the Windows 10 update settings page.
If you want to undo the changes, you can use the same instructions outlined above, but on step No.4, right-click the WindowsUpdate key, select the Delete option, then reboot the computer to apply the settings.


No comments:
Post a Comment